FROM NERVOUS NEWBIE TO DIY PRO: My First Experience Using a 360° Camera
By Taylor Somera / July 17, 2020

Despite the ridiculous amount of photos I take of my dog, I am not a professional photographer. I am also not a real estate agent, although I do spend a lot of time searching for homes online and I work with agents daily as the manager of vendor relations for Realty ONE Group. Still, when I received my first 360 camera, the nerves set in; would I know how to use it? Could I really figure out all its inner workings to publish a website-worthy virtual tour?
Here’s what happened from unboxing to unveiling the final results …
Like any new gadget, it’s exciting to take everything out of the box. First the instruction manual, then a soft case for the camera, the camera itself and a charging cord. I immediately downloaded the Ricoh Theta iphone app, plugged in the camera and began trying to connect my devices.It’s not connecting, what’s going on? 30 minutes pass.. The nerves are setting in, what am I doing? I called up a close friend, “I think I have a broken camera!” Embarrassingly, with his expertise we discovered I never powered the camera on. This wasn’t off to a great start. I thought to myself maybe this isn’t a good idea.
Finally, powered up and connected through the camera WIFI, I placed the camera on a monopod and started getting familiar with all the settings.
The camera used is the Ricoh Theta V. There are quite a few models of the Ricoh Theta the differences as you move up in model and price are the battery life, memory storage, image quality and stabilization. View full product line.
Testing the Camera
Now let’s get techy. We’re going to set up the camera to do a technique called bracketing. This allows the camera to capture the brightest white, the darkest blacks, and everything in between. This is a pro secret that will get you the best image possible, closest to what your eye actually sees. The process takes 5-7 separate images at different exposures in the click of a single button. Here is a step-by-step for bracketing with a Ricoh Theta.
This was my first experience using this technique. How do I know if I set it up correctly? Was the quality going to be what I want? The last thing I wanted was to re-shoot the virtual tour. So, for peace of mind I did an image test in my home and sent it through boxbrownie.com. Check it out, crisp, clear quality. Yes, it was that easy. And, this edit is only $4.00.

Preparing for the shoot
Before you shoot, clean your space - nobody wants to tour a room full of junk and clutter.
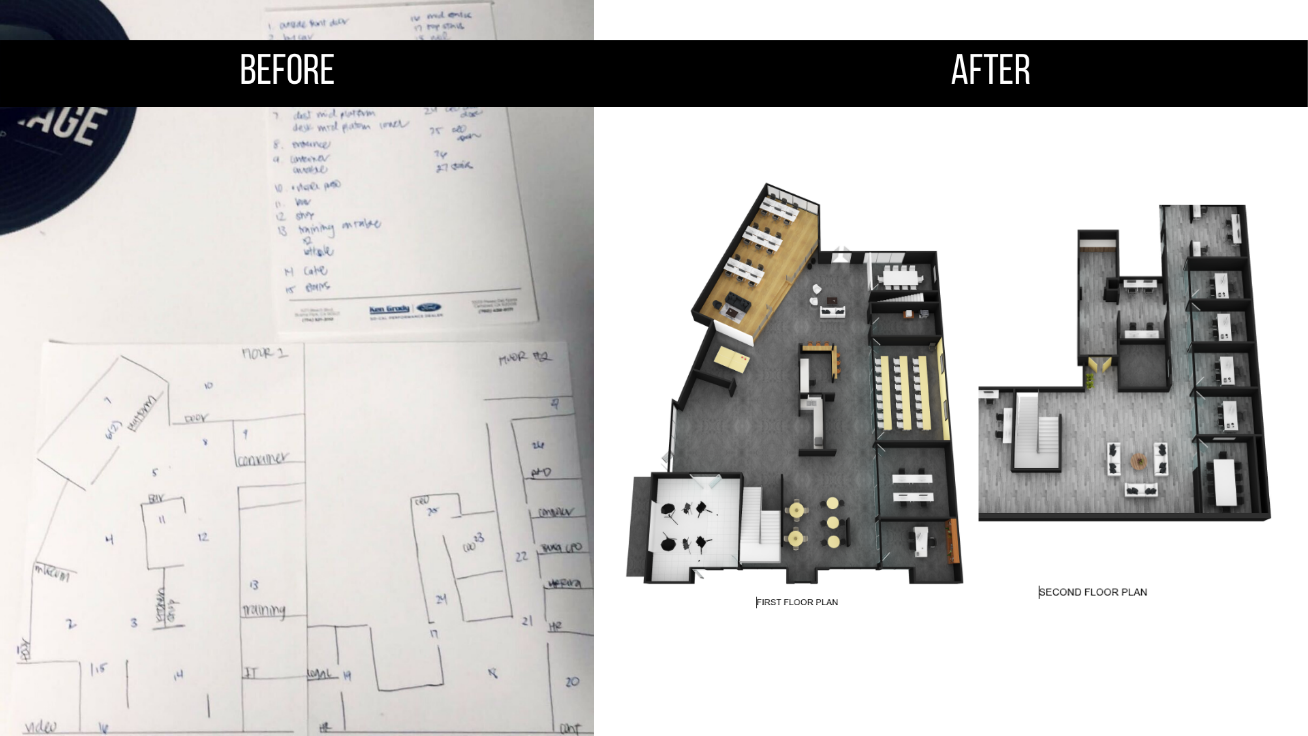
Next, you’ll need a floor plan. If you don’t have one, no worries! You can do just as I did and draw your own floor plan. Below is the before and after from a hand drawn floor plan to a 3D rendering with custom branding by boxbrownie.com. This edit was $64.00 but there’s options as low as $24.00; pricing depends on the particular floor plan style you need.
Capturing the Space
So, you’ve got the bracketing thing down and you’ve got your floor plan. Now you’re ready to put your new hardware and skills to work. With the camera, monopod and floor plan in hand, you’ll want to show up to your location at the exact time to capture your locale in its best and most beautiful light. Typically, anytime between noon and 3 p.m. works best. You don’t want to shoot too early in the morning, when the light is thin and unattractive or too late, when there’s pretty much no light to work with at all. Before you shoot, open every door to a room you plan on showcasing. Turn on every light and let the welcoming, bright vibes in. Open window shades and drapery to highlight the views that are visible from the interior of the space.
Extend your monopod to the tallest setting, which should be close to your height. Make sure it’s stable; you don’t want it to fall. If you need to, add weight to the bottom of your monopod stand for extra stability. Turn on your camera and connect your phone to the camera WiFi. Remember, you’re capturing a series of 360 images throughout the space from entrance to exit and you need to be out of the view of the camera from all angles. Getting out of the shot can be difficult especially in large open space floor plans. The trick is to set the timer on your camera, 5 or 10 seconds should suffice, to ensure you have time to run out the view before the camera takes its images.
Ready, set … click! Use the shoot button on your phone to trigger your camera countdown. Quickly run out of view as your camera goes to work, activated from your phone. Viola! You’re done with your first image. Log the location of the image on your floor plan and title it with a name or number, (I used both). Now move the monopod and camera through the space and the rooms, setting up about every 10 -15 feet apart in a logical path someone might take through your space. When in doubt take more images than you need; extra images you can trash are better than having to schedule another time to shoot again.
Let the Gurus Work Their Magic
Phew. You’re almost done. Once you’ve completed all your shots, it’s time to journey to your computer for uploading. Log back in to boxbrownie.com and send all of your images through as a 360 image enhancement job. In this step you’ll need to use the GROUP IMAGE feature to bundle your bracketed images for editing. The platform is super user-friendly and fast. Check out how quickly these images upload!
Sending your bracketed images will cost you $4 per image, which is a $60 investment for a standard home with fifteen 360 tour images. I received the images back in about 18 hours, although the website says 24-48 hours. Once you receive your edits, go through them carefully and note if you need any additional editing. You won’t notice in my final product but I utilized every enhancement offered from item replacement to virtual rendering. These added edits will take some time but again I received my edits back way sooner than expected and the quality - outstanding.
Finally, you’re ready for the gurus to create your virtual tour. This step will require you to upload your floor plan and all of your edited images. $16 dollars and 24 hours later you will have your final product! In under ONE week I went from finding the power button on the 360 camera to conquering the art of virtual tour. All it took was the confidence of using the camera, an hour of onsite shooting, and one to two days for the boxbrownie.com team to work their magic. It’s so easy my dog could learn it. If you’re a real estate agent and you’re not doing virtual tours after reading this article- what’s your excuse?